Table of Contents
What is a sales cadence?
A sales cadence is a sequence of follow-up calls, emails, sms messages, or other types of customer outreach in the effort of closing a deal. Some sales teams use only calling cadence's, others utilize email cadence's, while a more aggressive sales force may have a cadence for each communication method.
Sales teams use sales cadences to make sure their sales people contact the lead or customer consistently and not miss a chance to speak with them. It is also used to ensure their sales people do not contact the lead or customer too often, which can lead to a negative response, and possibly the loss of a sale.
Sales Cadence Example
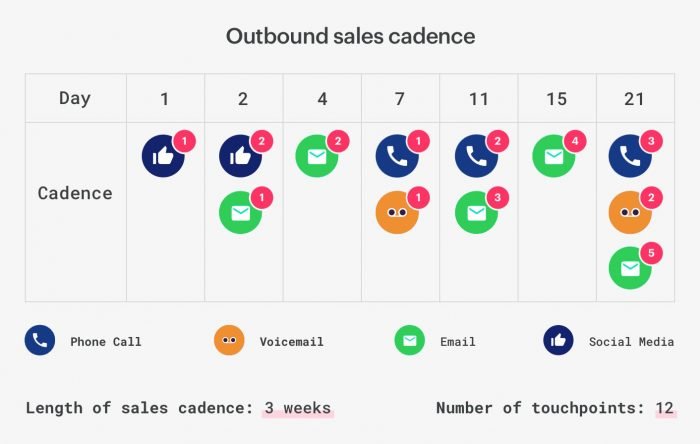
The sales cadence normally begins when a new lead arrives, or an existing customer requests information on a product or service. That initial outreach triggers the following sequence of outbound communication attempts.
Every sales cadence has rules in place, for this example the primary rule is never call the lead before 9 am and after 6 pm.
Day #1 - Call immediately upon lead creation
Day #1 - Email immediately upon lead creation
Day #1 - Call #2 twenty four hours after call #1
Day #2 - Call #3 three hours after call #2
Day #3 - Call #4 one day after after call #3
Day #3 - Email #2 forty eight hours after email #1
Day #4 - Call #5 one day after call #4
Day #5 - Call #6 one day after call #5
Day #5 - Email #3 two days after email #2
Day #5 - Call #7 three hours after call #6
Day #6 - Call #8 one day after call #7
Day #8 - Call #9 two days after call #8
Day #12 - Email #4 seven days after email #3
Day #12 - Call #10 four days after call #9
This is a simple calling and emailing cadence example, but nevertheless it is a sales cadence that each new lead into the CRM will be a part of.
Build the Sales Cadence
Now that you understand what a sales cadence is, we can build it in the CRM (which is the fun part).
There are two steps to build the sales cadence in your CRM. The first step is to create the automations, the second step is to create a to-do list on the home dashboard for your sales team.
Create the Automations
Creating the workflow automations is the main part of building the sales cadence. After they are configured, the automations will do all of the work for you, creating and assigning the tasks automatically, and serving the next lead to be called. Without this step, the sales manager would need to manually remind the sales person who to call, which is completely unnecessary and impractical.
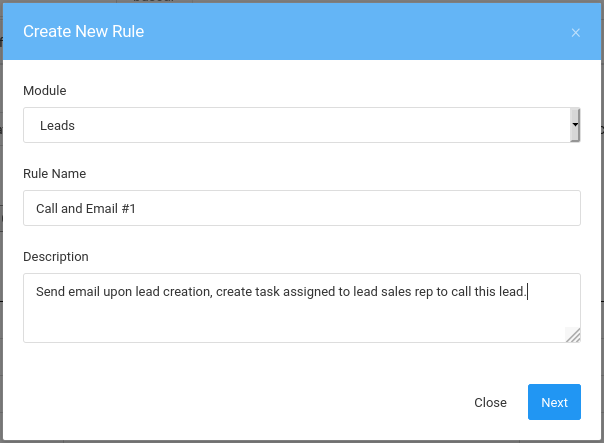
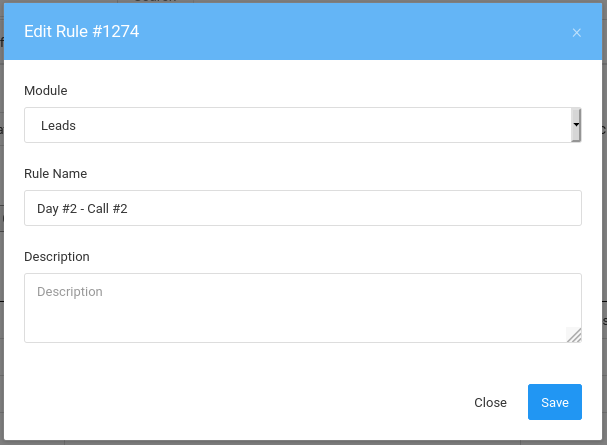
Login to your CRM with administrator privileges and click your username > Settings > Automation. The automations page will show you a list of all active automations your CRM currently is using. Click the Create Rule button, choose Leads as the module for this automation, and name it Call and Email #1.
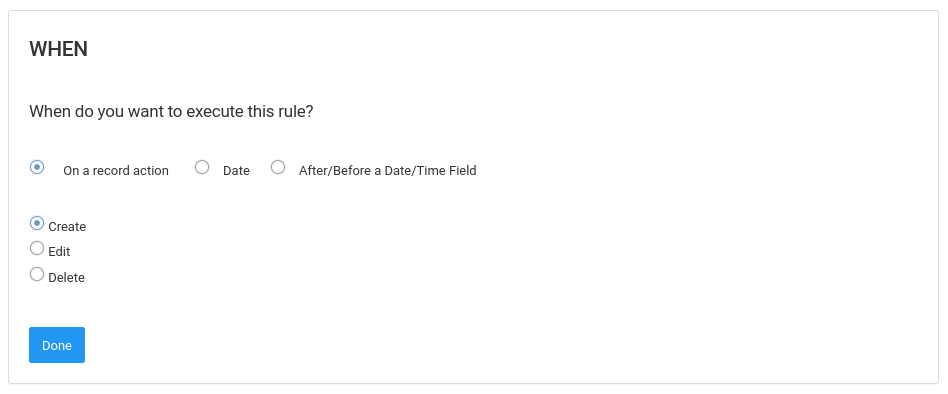
After creating the workflow rule you will be redirected to create the automation. There are three parts to this, first you must tell the CRM when to execute the rule. For the first sequence of the sales cadence we select to execute the rule on create.
Second you must enter at least one filter. A filter is a check that is performed to verify the necessary data exists. This is important because if the lead does not contain an email address we do not want to proceed with the email portion of the sales cadence.
Lastly what actions will be performed by this workflow. The last step in creating the first sequence of the sales cadence is to create the actions. This workflow will include two actions, send an email, and create a task assigned to the sales person who owns the lead to notify the rep to call the lead.
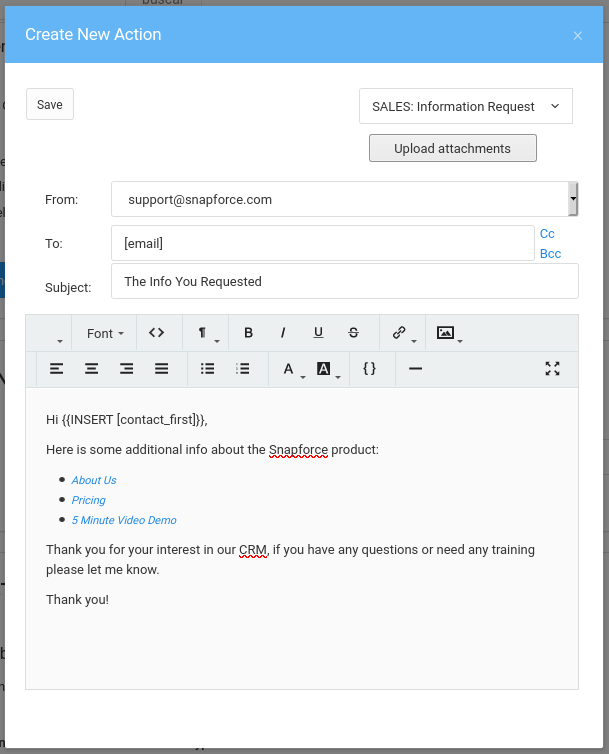
To create the first workflow action click the action type drop down menu and select Email. The first field in the email form is the From field, this field is a drop down menu that lists all of the email accounts you have configured in the CRM. If you do not have any email accounts configured yet you will need to stop and do that first, you can read the SMTP setup instructions to do that now.
The To field will be the email of the newly created lead, to use their email address use the placeholder [email]. Write your own subject and body and when ready save it. You can use any field within the lead as a placeholder inside of the email subject and email body.
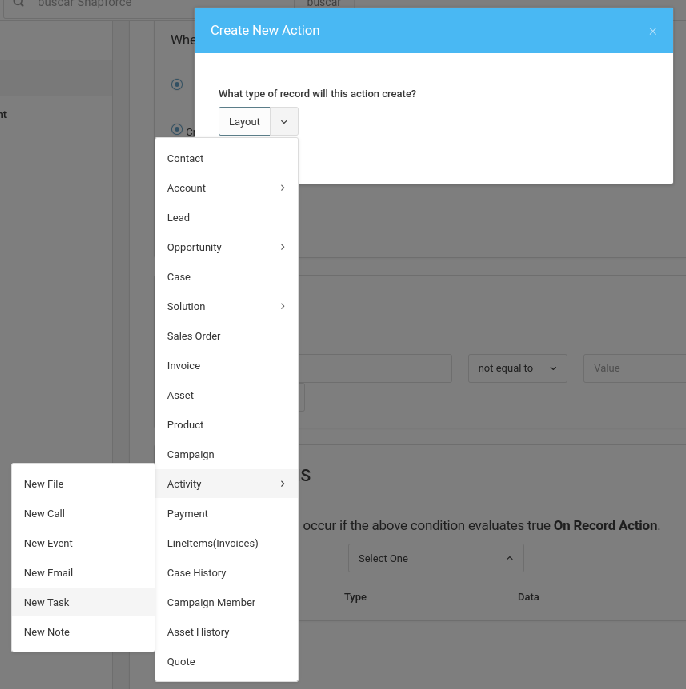
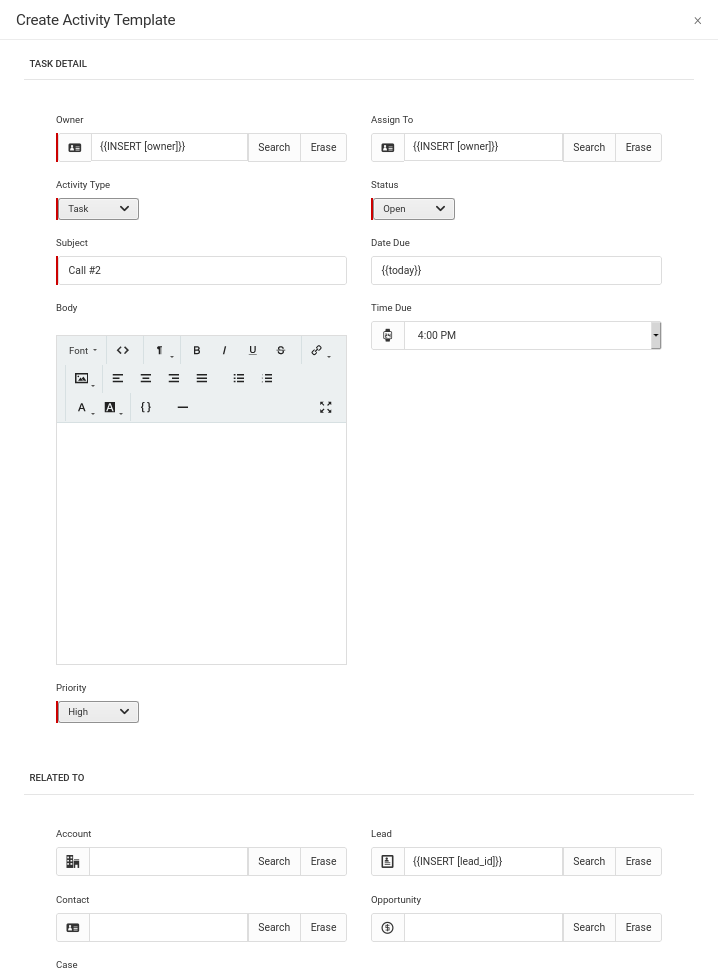
The second action for this workflow will be a task that will be automatically created and assigned to the sales person who owns the lead. From the action type drop down menu select Create. Click the module button and hover over Activities > then click Task.
The task form will pop-up to be filled out, this will act as the template for the task that is automatically created and assigned to the sales person. For the owner and assigned to fields use the following syntax {{INSERT [owner]}}, that refers to the owner of the lead. To learn more about the syntax for creating automations read CRM workflow syntax in the automations documentation.

The first sequence of the sales cadence has now been built. Each day or sequence of the sales cadence needs it's own workflow automation. Day two of the sales cadence we will create now, all of the other days are built the exact same way.
Begin by creating a new workflow rule like we did above for the Leads module.
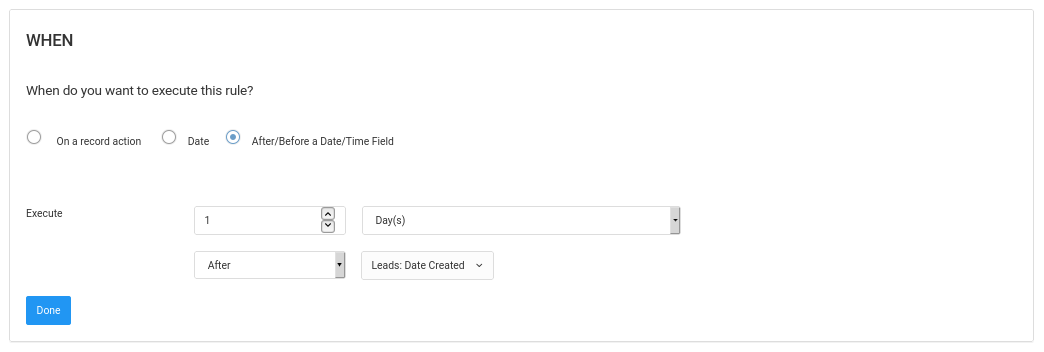
The next part is the only difference between the first workflow rule we created for day one and each of the rules we will create for the proceeding days of the cadence. When choosing when to execute the workflow automation, select After/Before a Date/Time Field. Then choose to execute the workflow one day after the lead was created. This method of automation provides you the power to automatically trigger workflow actions based on how much time has past from any date field in the lead, in this case use the date time created field. This means our automation will run automatically one day after any new lead is created in the CRM.
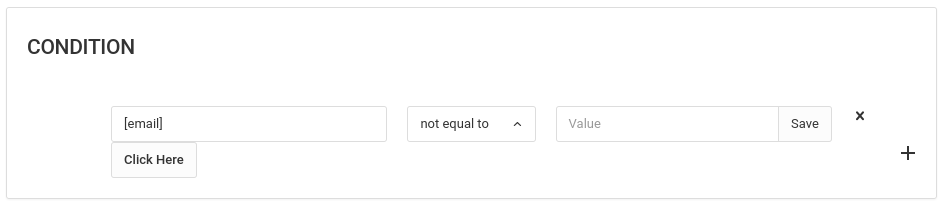
The next step is to create a condition for the system to check before it proceeds and runs the workflow actions. The condition will check if the lead has a phone number, if there is no phone number on the lead the task will not be created for Call 2.

The last step is to create the workflow action like we did for day one. The same fields should be completed as in day one, but the subject of the task should say Call #2. This is so the owner of the lead who receives the task knows what it is for.
The sales cadence sequence for day two is now complete, so far our sales cadence is built for day one and two. All of the remaining days in the cadence will be built the same way we did for day two, the only difference is the "execute on" step, you will put the sequence day for the field that asks how many days past the leads date time created.
Creating a To-Do List
The last thing to do after building the remaining workflow automations is to give the sales people a way to see the tasks assigned to them for the day. A great way to do this is a home dashboard. In CRM, dashboards are a way to quickly see a snapshot of your company performance, but they are also used by individual sales people to track their individual performance.
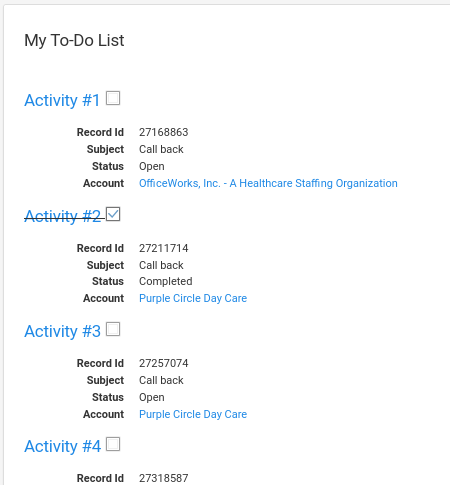
When the sales person logs into the CRM they will land on the home dashboard and see their to-do list, for this example sales cadence it will act as a call schedule for the day. Showing them which leads they are supposed to call.
To create the to-do list all we need to do is create a report in the reports module and drop it onto the home dashboard.
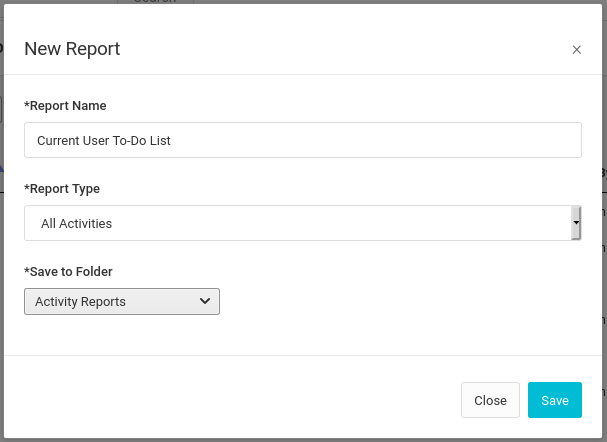
Click reports on the left sidebar > then click new report. Name the report "Current User To-Do List". Choose leads from the module drop down menu, and select the activities folder from the folder drop down menu.
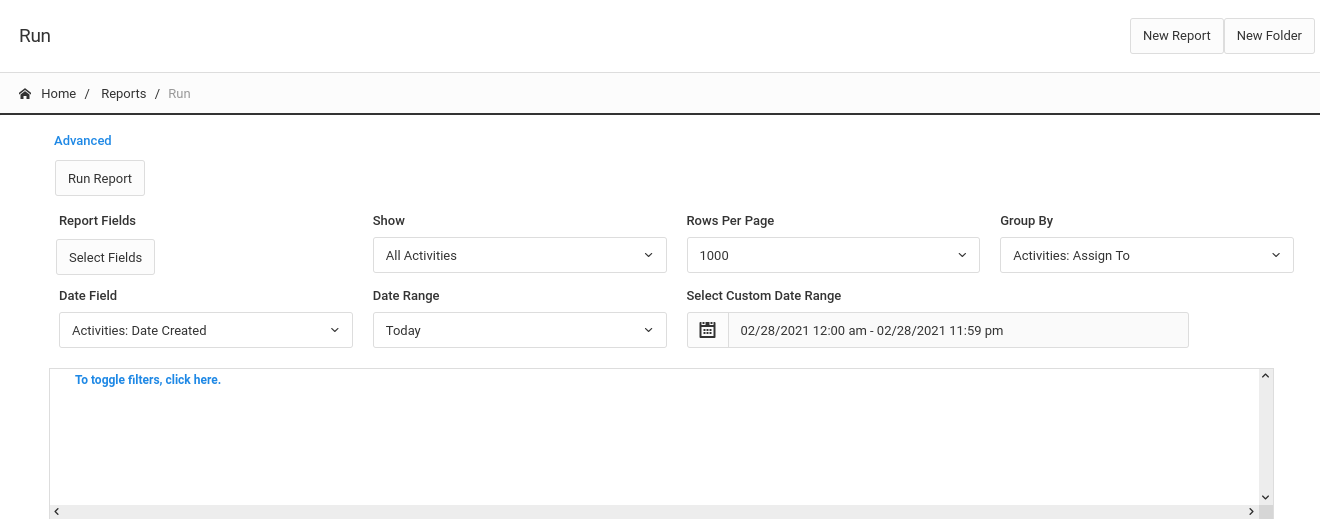
Once inside the new report, there are a few more changes we need to make. By default a new report will show all of the data for that module, so we need to click the Advanced option at the top of the report to change the report settings. Select the Assign To field in the Group By drop down menu. In order to use a report on the dashboard the group by field cannot be empty. Additionally choose Today from the date range drop down menu. By selecting one of the options in the date range drop down the report will always show real time data, instead of choosing a custom date range where the report will always show the same data for that specific date range. After making these changes click the Run Report button, which saves the changes and reloads the report.
The last change we need to make to the to-do list report is add a custom filter so it only shows the tasks assigned to the current user logged in. To do this click the "Toggle Filters" option, and choose the "Assign To" field from the field drop down menu. The operator should be the equal sign, and the value for the filter should be the placeholder "{current user}". This is an available placeholder that can be used in any report or custom view filter in Snapforce.

At this point the sales cadence has been built, and the custom to-do list report is created, the last thing to do is drop the report on to the home dashboard. After this any user that logs into the CRM will see there to-do list appear, which will automatically be populated with the tasks that they are assigned each day.
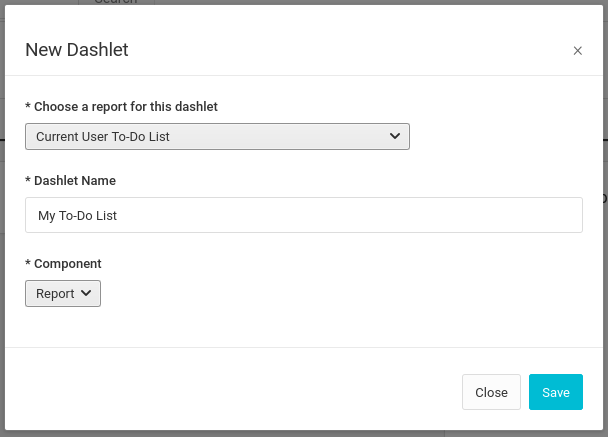
Dropping the report onto the dashboard is easy, just click on "Home" on the left sidebar, and select the "Home Dashboard" from the drop down menu at the top of the page. Click the plus icon under whichever dashlet you choose to have the to-do list appear. Upon clicking the plus icon a pop-up will appear, select the new report we just created called "Current User To-Do List", and write "My To-Do List" for the dashlet title.
At this point we are finished, the sales cadence is complete, and the home dashboard of the CRM now shows every sales person the calls they are responsible for each day. If they forget to mark a task completed, or they cannot finish their tasks for the day, you can create another report to see all past due tasks.